Microsoft Outlook Express Internet Mail setup.
New Automated Outlook Express Setup program
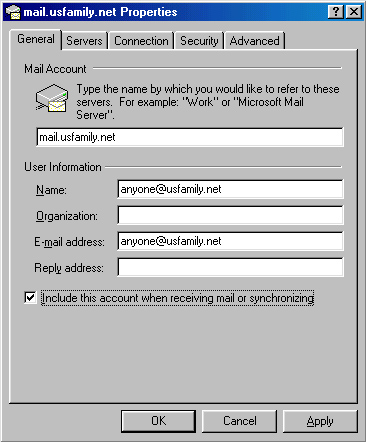
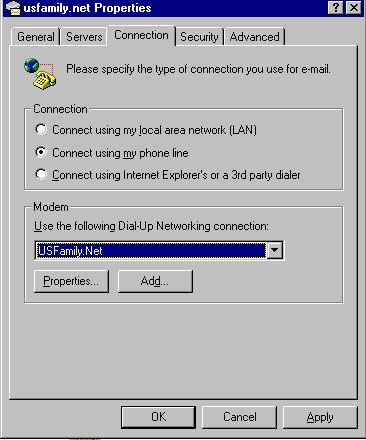
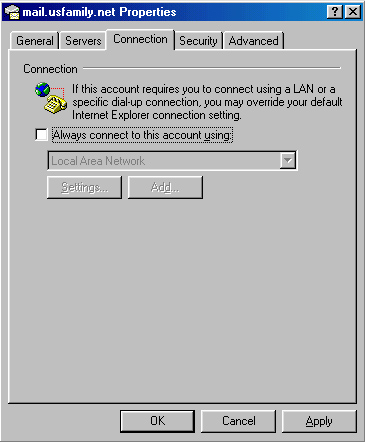
To create a new or additional email account
If you have a usfamily.net account already which you need to update
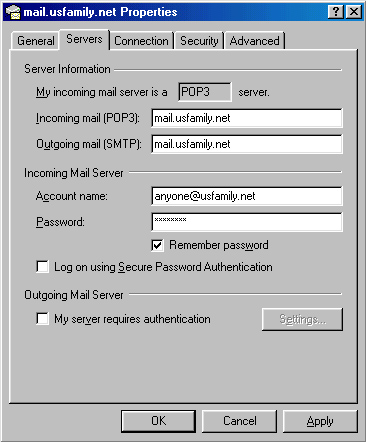
remember if your mailbox domain is @usjet.net, @usgo.net etc. replace all usfamily.net with your domain name!!
or
SIGN YOUR NAME WITH
SIGNATURES
If you've ever received an e-mail from someone who includes a bunch of
personal gobbledygook at the close of their message, you've seen what is called a
signature. The equivalent of a signed name in the offline world, e-mail signatures give
you an easy way to include important contact information in your messages.
Creating a signature in Outlook Express 5 is easy.
1. Click on the Tools menu and select Options.
2. Click the Signatures tab and select the New button to create a new signature.
3. In the Edit Signature box on the bottom, type in the message and contact information that you want to include in your outgoing mail. Typical signatures consist of:
4. When you're satisfied with your signature's appearance, click the Apply button on the bottom to activate the signature. You may want to rename the signature, instead of accepting the default name "Signature#1." Do this by clicking the Rename button in the Signatures field. If you have multiple accounts set up, you'll definitely want to do this so that you don't have to guess which signature to include.
Other options include the ability to automatically attach your signature to all outgoing messages. Click the checkbox at the top of the window to do this. It may not make sense to do this, however, because if you're e-mailing a close friend, he or she will already have that information, and it will be just wasted bits and bytes. Plus, attaching a signature often creates a feeling of formality, and that's usually unnecessary with close acquaintances.
5. You can also click the Advanced tab at the bottom to choose which e-mail and newsgroup accounts to which you want to assign your signature. Finally, if you have your signature stored in a text or HTML file, click the File radio button at the bottom and browse your desktop to locate and insert it into your file.
6. Now, when you're finished typing a message, go to the Insert menu and select Signature. If you only have signature set up, it will be entered by default. If you have multiple signatures, however, you can choose which to include. Just be sure to name them accurately.
CREATE A NEW IDENTITY
If two people or more share a POP mail account with Outlook Express, you
might want to set up multiple identities. Similar to Netscape's Profiles, multiple
identities allow you to basically have a separate copy of the program on the same
computer. No more sharing your POP mail account with Junior! Here's how to do it:
1. Click the File menu
2. Select Identities > Add New Identity
3. Type a name for this identity and decide whether you want to password-protect it. Then,
choose a password or hit OK.
4. Outlook Express will then prompt you whether you want to switch to your new identity.
If you select Yes, you will be taken through the new Internet connection wizard,
where you can configure the e-mail account that you want to associate with the new
identity. If you hit No, you'll be taken to the Manage Identities window,
where you have the option to create another identity, remove an Identity, or view the
identity's properties. Finally, you can select the default identity that is used when you
launch Outlook Express.
HAVE IT YOUR WAY WITH MESSAGE RULES
Message Rules are an invaluable feature of Outlook Express. Basically, rules are filters you configure that take action on an incoming message based on conditions you set.
For example, if you are plagued by spam, you may want to set up a message rule that will take any message with the word "free" in the subject and move it to the Deleted Items folder, so that you won't have to deal with it. It's not a perfect way to combat spam, but it helps.
To set up message rules, highlight Tools > Message Rules > Mail on the menu bar. This will bring up the New Mail Rule window. Setting up a message rule is a four-step process:
1. Select the conditions for your rule:
here are several options here, so scroll through the available list. The most obvious
conditions are when the message subject contains a certain word, when the message is from
a certain person and when the body contains certain words. But, there are other options,
such as when the message is marked as a priority. When you select a condition in section
1, you will notice that in section 3 the condition appears. You will have the opportunity
to specify the condition further in step 3.
2. Select the actions for your rule:
Once you've selected a condition, you need to tell Outlook Express what to do with the
message. For unwanted mail, you'll probably want to delete it when it matches your
condition. But another useful application is to filter your incoming mail from friends or
colleagues into topical folders. For example, you could have a folder for messages from
your best friend, and have the messages routed into the folder as soon as they're
received. In essence, it's a way to save you time.
3. Rule description:
If your rule contains a word with a blue hyperlink, click it to specify the rule's
properties. For example, if you want to delete all incoming mail with "free" in
the subject, you will click the blue link and enter the word "free" in the text
box.
4. Name of the rule:
Finally, enter a descriptive name for your new message rule, so you can easily remember
what it's used for. Hit OK and your message rule is complete. You may want to send
yourself a test message matching your conditions to see if it works to your satisfaction;
if not, simply revisit Tools > Message Rules > Mail, and you'll see your
message rule on the list. Edit it by clicking Modify.