Windows NT 4.0 Dialup Networking Install
Step 1:Start your NT Configuration by logging into NT. Once you are logged into NT double click the My Computer Icon:
Step 2: Double-click on the Dialup Networking Icon:
Step 3: If you do not have Dialup Networking installed you will be prompted to install it. If you already have it installed, skip to step 14.
Step 4: Insert the Windows NT 4.0 CD-ROM into the CD-ROM Drive and click OK.
Step 5: A status box will show the install progress.
Step 6: If you already have your modem installed it should be listed in the drop down box, click OK. If not, choose the install modem button and install your modem.
Important - Make sure you choose the correct modem and COM port for your computer or your connection will NOT work. Usually COM1, COM2, COM3 or COM4.
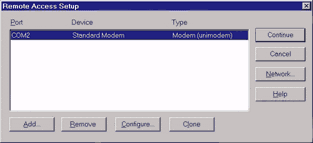
Step 7: At the Remote Access Setup screen choose the configure button.
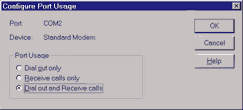
Step 8: If you are going to Dial Out to the Internet Only, you can choose "Dial out only" or "Dial out and receive calls." Select one of these options and click OK.
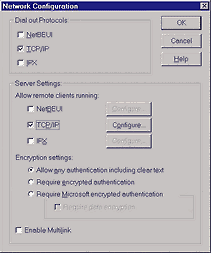
Step 9: You will be returned to the Remote Access setup screen. From here click on the Network button and the network configuration screen will appear. On this screen select ONLY the dialout protocol TCP/IP and click OK.
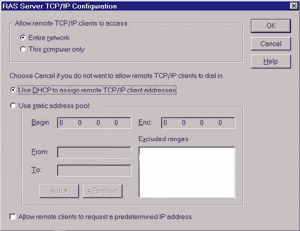
Step 10: You will again be returned to the Remote Access Setup screen, this time click OK. If you are allowing dialing you will have to configure the RAS Server TCP/IP Configuration screen.
Step 11: Remote Access will continue its install and notify you that it has been installed, select OK.
Step 12: You will need to restart, this can be done by clicking on the restart button.
Step 13: Once the computer restarts, relogin and double click the My Computer Icon and then double-click the Dialup Networking Icon.
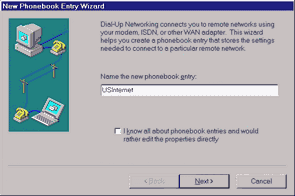
Step 14: On a new install you will be prompted to create a phone book entry. Enter the name of your connection (i.e. USFamily.net) and select next. If this was not a new install select new button from the Dialup Networking Screen.
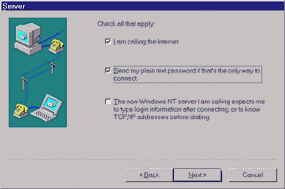
Step 15: On the Server screen select the two options: 1. I am calling the Internet. and 2. Send my plain text password if that's the only way to connect.
Step 16: Select the Use Telephony dialing properties and enther the phone number and area code you are dialing (i.e. 651-628-8803).
Step 17: Select Finish and your new connection should be Installed.

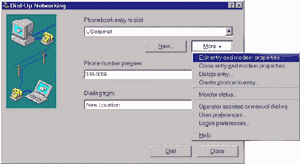
Step 18: Under the More button on the Dialup Networking Screen, choose: Edit Entry and Modem Properties.
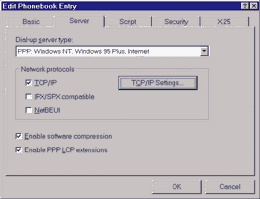
Step 19: Choose the Server Tab and select TCP/IP Settings...
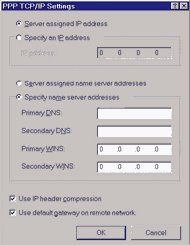
Step 20: At the PPP TCP/IP Settings... screen select the Specify Name Server addresses and enter the Primary DNS Address: 207.225.145.55 and the Secondary DNS Address: 207.225.145.251. Click OK when done.
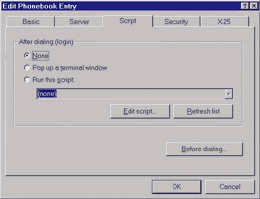
Step 21: Click on the Script tab and make sure that none is checked.
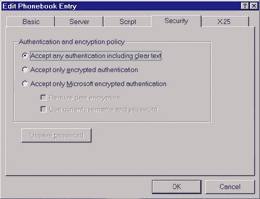
Step 22: Click on the Security Tab and make sure that "Any Authentication including clear text" is checked. Click OK
You are now done installing and configuring NT 4.0 Dialup Networking.